
Using Macro Photography To Highlight Frog Details: Capturing Nature’s Intricate Amphibians
Macro photography reveals a hidden world of intricate details in frogs. This technique brings out textures, colors, and features that often go unnoticed by the naked eye.
Using a macro lens and proper lighting techniques, you can capture stunning images of frog eyes, skin patterns, and even tiny toe pads.
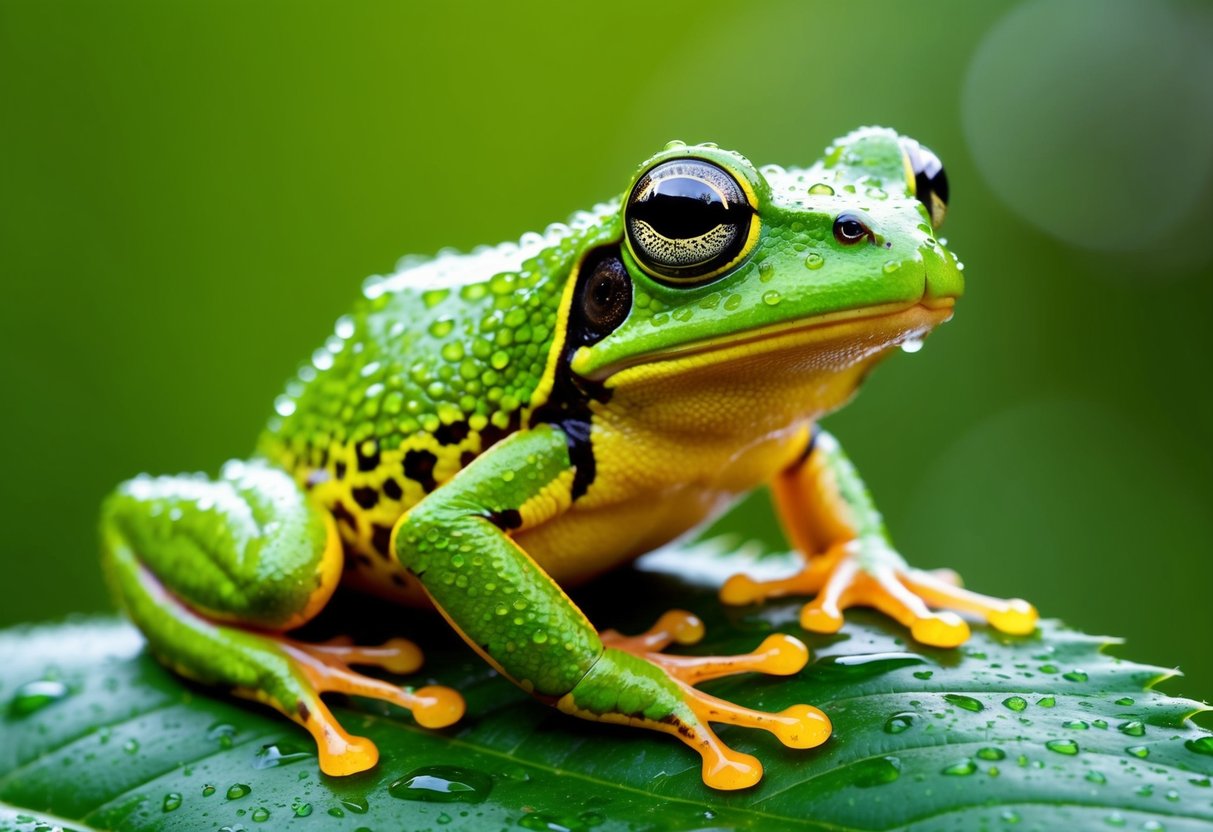
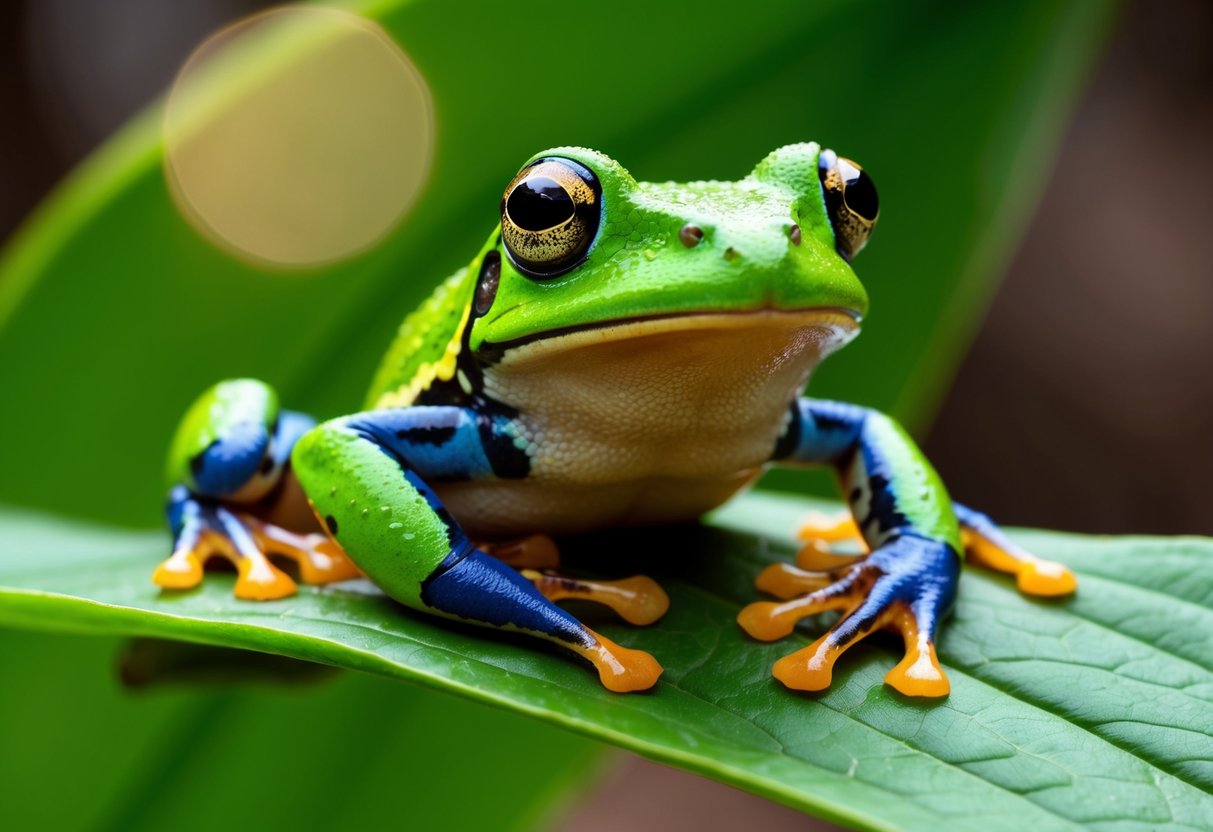
Frogs make great subjects for macro photography due to their small size and unique features. Their big eyes, colorful skin, and interesting textures offer endless creative possibilities.
With the right approach, photographers can showcase the beauty and diversity of these fascinating creatures.
Getting close to frogs requires patience and care. It’s important to respect the animals and their habitat while taking photos.
Using a longer macro lens allows for some distance, reducing stress on the frogs and increasing the chances of capturing natural behaviors.
Understanding Macro Photography
Macro photography is a special type of close-up photography. It shows tiny subjects in great detail. With macro photos, small things look much bigger than they do in real life.
The key to macro photography is the reproduction ratio. This tells how big the subject looks in the photo compared to its real size. A 1:1 ratio means the subject is life-size on the camera sensor.
Macro lenses are made for this type of photography. They let you focus very close to small subjects. Some other gear that helps with macro shots includes:
- Extension tubes
- Close-up filters
- Tripods
- Lighting equipment
One challenge in macro photography is depth of field. This is how much of the photo is in focus. With macro shots, the depth of field is often very shallow. Photographers must be careful to get the right parts in focus.
Lighting is crucial for macro shots. Natural light works well, but can be hard to control. Many photographers use special lights or flashes for their macro work.
Composition is also important. Macro photos can show textures and details in new ways. This lets photographers create interesting and eye-catching images of small subjects.
Essentials of Macro Photography Equipment
Macro photography needs specific gear to capture tiny details. The right tools help photographers get sharp, clear close-ups of small subjects like frogs.
Choosing the Right Camera
For macro shots, a camera with manual focus is key. Many digital cameras work well, but some excel at close-ups. Full-frame cameras offer better image quality and low-light performance. Crop-sensor cameras give more reach, making small subjects appear larger.
Mirrorless cameras are great for macro work. They’re lighter and often have features like focus peaking. This helps nail focus on tiny details.
Some key features to look for:
- High resolution sensor
- Good low-light performance
- Live view with focus magnification
- Weather sealing for outdoor shoots
Macro Lenses for Detailed Imaging
A good macro lens is crucial. These lenses focus very close to subjects, showing tiny details. True macro lenses offer 1:1 magnification. This means the subject appears life-size on the camera sensor.
Macro lenses come in different focal lengths:
- 50-60mm: Good for small objects, but you’ll be very close to live subjects
- 90-105mm: Versatile, gives more working distance
- 150-200mm: Best for skittish subjects like frogs, allows shooting from further away
Look for lenses with image stabilization for sharper handheld shots. Prime lenses often give better image quality than zoom lenses for macro work.
Utilizing Extension Tubes and Close-Up Filters
Extension tubes and close-up filters are budget-friendly macro options. They work with lenses you already own.
Extension tubes fit between the camera and lens. They move the lens farther from the sensor, allowing closer focus. Electronic extension tubes maintain autofocus and metering.
Close-up filters screw onto the front of a lens like a filter. They act like a magnifying glass. They’re easy to use but can reduce image quality a bit.
Both tools are lightweight and portable. They’re great for trying macro photography before investing in a dedicated macro lens.
The Role of Tripods in Stabilization
A sturdy tripod is vital for sharp macro images. Even tiny movements can blur close-up shots.
Look for these features in a macro tripod:
- Stability in various positions
- Ability to get low to the ground
- Quick and easy adjustments
- Reversible center column for low-angle shots
A ball head or geared head offers precise control. For extra stability, use a remote shutter release or your camera’s self-timer.
Some photographers use a focusing rail on their tripod. This allows fine adjustments to focus without moving the whole setup.
Frog Anatomy and Features to Highlight
Frogs have unique physical traits that make them fascinating subjects for macro photography. Their diverse textures, expressive eyes, specialized limbs, and vivid colors offer many exciting details to capture up close.
Texture of Skin
Frog skin varies greatly between species. Some frogs have smooth, moist skin while others are rough and warty. Macro photos can reveal intricate skin textures and patterns in stunning detail.
Many tree frogs have tiny bumps called tubercles on their skin. These give them a grippy texture for climbing. Other frogs have ridges, folds, or spines that create interesting textures.
The glands in frog skin are another feature to highlight. Some produce toxins as a defense mechanism. Macro shots can show the pores where these secretions emerge.
Frog skin often has a wet, glossy look. This moisture barrier is crucial for their survival. Close-up photos can capture water droplets or the sheen of their skin.
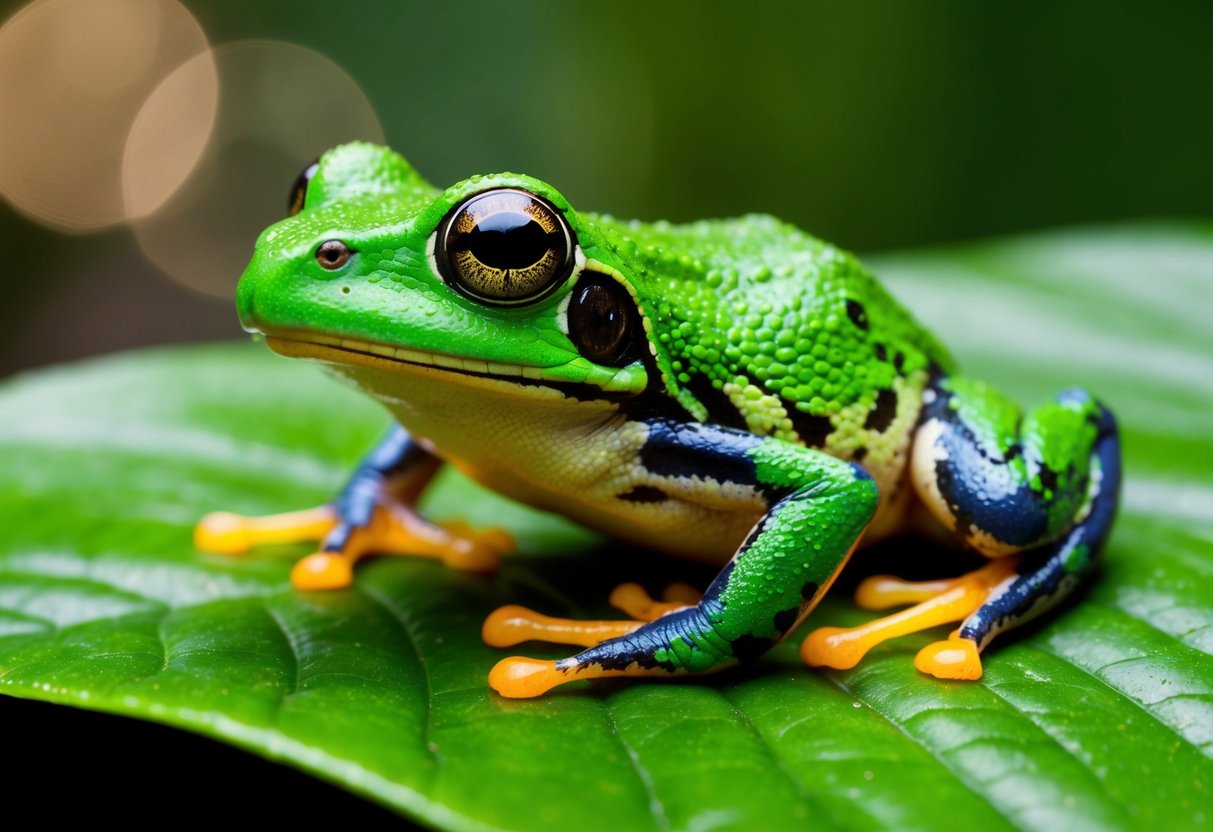
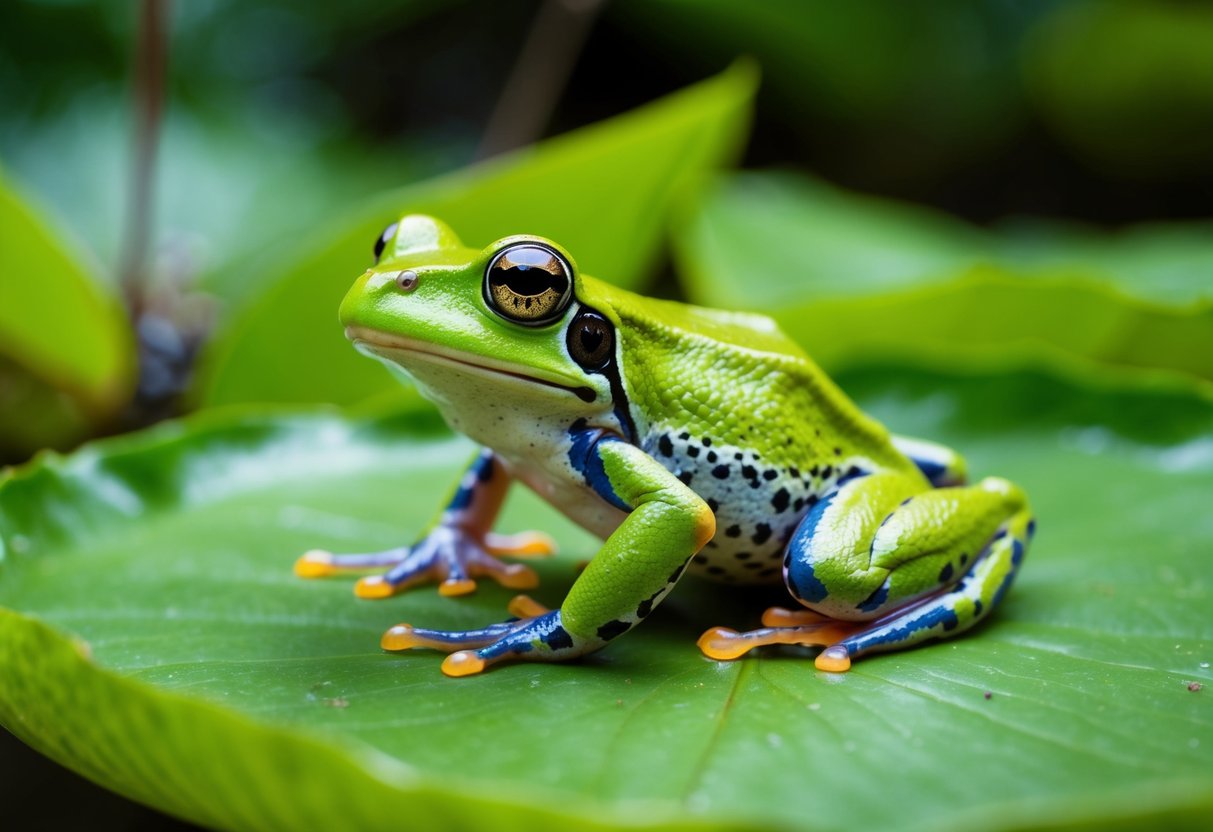
Eyes and Visual Patterns
A frog’s eyes are one of its most striking features. They are typically large and bulging, with horizontal pupils. Macro photography can reveal the intricate patterns in their irises.
Many frogs have golden or copper-colored eyes with dark pupils. Others have vibrant reds, blues, or greens. Some even have patterns like stripes or speckles in their eyes.
The nictitating membrane is another interesting eye feature. This translucent eyelid helps protect and moisten the eye. Macro shots can sometimes catch this membrane in action.
Frogs often have distinct markings around their eyes. These may include dark “masks” or light-colored stripes. Such patterns can add visual interest to close-up portraits.
Limb Structure
Frog limbs are specially adapted for jumping and swimming. Their powerful hind legs are much longer than their front legs. Macro photos can highlight the muscular structure of these legs.
Many frogs have webbed toes on their back feet. These webs help them swim efficiently. Close-up shots can show the delicate skin between each toe.
The toe pads of tree frogs are particularly interesting. These sticky pads allow them to cling to smooth surfaces. Macro photography can reveal their tiny suction-cup-like structure.
Some frogs have claws or spurs on their feet. These help with digging or gripping. Detailed photos can showcase these small but important adaptations.
Vibrant Coloration
Frogs come in a wide array of colors and patterns. Some are camouflaged to blend in with their environment. Others are brightly colored to warn predators of their toxicity.
Macro photography can capture subtle color variations and gradients on a frog’s skin. It can also reveal iridescent qualities that might not be visible to the naked eye.
Many frogs have intricate patterns like spots, stripes, or mottling. These can create visually striking macro images. Some patterns are so fine they’re only visible up close.
The undersides of frogs often have different colors than their backs. This can create interesting contrasts in photos that show both areas.
Lighting Techniques for Macro Photography
Good lighting is essential for capturing detailed frog photos. The right techniques can bring out textures and colors in stunning clarity.
Natural Light Vs. Artificial Light
Natural light can create soft, flattering illumination for frog portraits. Early morning or late afternoon sunlight works best, casting a warm glow. Cloudy days provide even, diffused light that reduces harsh shadows.
Continuous LED lights are popular for artificial lighting. They offer stable, adjustable illumination. Flash can freeze motion but may startle frogs. Ring lights attach to the lens for even lighting.
Combining natural and artificial light often yields the best results. A fill flash can brighten shadows while preserving the natural lighting.
Diffusion and Reflectors
Harsh direct light can create unflattering shadows on frogs. Diffusers soften light, reducing contrast. A simple white sheet or translucent plastic works well.
Reflectors bounce light back onto the subject, filling in shadows. White foam board or aluminum foil on cardboard make cheap DIY reflectors.
Positioning is key. Place diffusers between the light source and frog. Angle reflectors to direct light where needed. Experiment with different setups to find the most flattering look.
Controlling Shadows and Highlights
Careful light control brings out frog textures and details. Side lighting emphasizes surface features. Backlighting creates dramatic silhouettes.
Use multiple lights to reduce shadows. A main light provides overall illumination. Fill lights soften shadows on the opposite side.
Adjust light intensity and angle to manage contrast. Dim lights or move them farther away to reduce harsh highlights. Bring lights closer for more dramatic effects.
A macro photograph’s composition is largely determined by lighting. Proper technique ensures sharp, vibrant images that showcase a frog’s unique features.
Composition and Framing Strategies
Capturing stunning frog details through macro photography requires careful attention to composition and framing. These techniques help create visually appealing and impactful images that showcase the unique features of frogs.
Rule of Thirds in Macro Shots
The rule of thirds is a valuable tool for creating balanced macro compositions. To apply this technique, imagine dividing your frame into a 3×3 grid. Place key elements of your frog subject along these lines or at their intersections.
For example, position the frog’s eye at one of the grid intersections. This draws the viewer’s attention to the most expressive part of the frog.
When photographing a frog in profile, leave space in front of its face. This technique, known as lead room, creates a more natural and appealing composition.
Background Isolation
Isolating your frog subject from the background is crucial for emphasizing its details. Use a wide aperture, such as f/3.2 to f/5.6, to create a shallow depth of field. This technique blurs the background, making the frog stand out.
Choose backgrounds that complement your subject. Soft, muted colors work well to highlight the frog’s textures and patterns. Avoid busy or distracting backgrounds that might compete with your main subject.
Consider the color contrast between the frog and its surroundings. A green frog against a red flower, for instance, can create a striking visual impact.
Creating Depth of Field
Controlling depth of field is essential in macro photography to guide the viewer’s focus. Use a narrow aperture (higher f-number) to increase depth of field when you want to capture more of the frog in sharp focus.
For creative effects, try focusing on specific parts of the frog. Highlight textural details like skin patterns or the intricate structure of its eyes.
Experiment with different angles to add depth to your images. Shooting from slightly below eye level can make the frog appear more prominent and create a sense of its environment.
Working in the Field
Capturing frogs in their natural habitat requires careful planning and respect for the environment. Photographers need special skills to approach these sensitive creatures without causing harm or distress.
Approaching Frogs in Their Habitat
Macro photography in rainforests presents unique challenges. Frogs are easily startled, so photographers must move slowly and quietly. Using a longer macro lens allows for a greater working distance.
Night photography often yields the best results. Many frogs are nocturnal and more active after dark. A headlamp with a red light setting helps locate frogs without disturbing them.
Patience is key. Waiting for the perfect moment can result in capturing natural behaviors. Photographers should observe frogs from a distance before moving closer for shots.
Environmental Considerations
Rainforest environments are delicate ecosystems. Photographers must take care not to damage plants or disturb other wildlife while seeking frogs.
Lighting can be challenging in dense forests. Using a diffused flash helps illuminate subjects without harsh shadows. Ring flashes or twin flashes provide even lighting for close-up shots.
Humidity and rainfall can damage camera equipment. Waterproof cases and silica gel packets help protect gear. Cleaning equipment daily prevents fungal growth on lenses.
Ethics of Wildlife Photography
The welfare of frogs must always come first. Photographers should never handle or move frogs for a shot. This can stress the animals and spread harmful pathogens.
Using manual focus allows for precise control without disturbing subjects. Limiting time spent near each frog reduces stress on the animal.
Accurate representation is crucial. Editing should enhance images without misrepresenting the frog’s natural appearance or behavior. Captions should provide context about the species and its habitat.
Post-Processing Macro Images
Post-processing plays a key role in bringing out the intricate details of frog macro photography. Proper editing techniques can enhance textures, correct colors, and create stunning final images.
Basic Editing Techniques
Start by adjusting exposure and contrast to bring out the frog’s features. Crop the image tightly to focus on unique details like eye patterns or skin texture.
Use sharpening tools carefully to enhance clarity without introducing artifacts. A slight increase in clarity can make textures pop.
Reduce noise selectively, focusing on smooth areas while preserving fine details. This helps maintain a clean look without losing important textures.
Adjust white balance to ensure accurate color representation of the frog’s skin tones. Small tweaks can make a big difference in the overall mood of the image.
Enhancing Textures and Details
Utilize local adjustment tools to bring out specific textures in the frog’s skin. Brushes and gradient filters allow for precise control over different areas.
Experiment with texture sliders to accentuate the tiny bumps and ridges on the frog’s body. Be careful not to overdo it, as this can make the image look unnatural.
Use detail enhancement techniques to bring out fine structures like individual scales or the intricate patterns in the frog’s eyes.
Consider focus stacking if multiple shots were taken. This technique combines several images to achieve a greater depth of field, crucial for showing the entire frog in sharp detail.
Color Correction for Natural Representation
Aim for accurate color reproduction to showcase the frog’s true appearance. Avoid oversaturation, which can make the image look artificial.
Use selective color adjustments to fine-tune specific hues. This is especially useful for enhancing subtle color variations in the frog’s skin or eyes.
Pay attention to the background colors. Adjust them to complement the frog without overpowering it. Subtle changes can greatly impact the overall image.
Challenges and Solutions in Frog Macro Photography
Taking close-up photos of frogs can be tricky. Frogs move quickly, live in wet places, and often hide in dark spots. But there are ways to get great frog pictures.
Dealing with Movement
Frogs jump fast. This makes it hard to get clear shots. To fix this:
- Use a fast shutter speed. 1/250th of a second or faster works well.
- Try burst mode. It takes many photos at once. You’re more likely to get a good shot.
- Get your camera ready before the frog moves. Focus on where you think it will jump.
- Use a flash to freeze motion. A macro flash helps light up small details.
- Be patient. Wait for the frog to settle down. They often sit still after moving.
Managing Moisture
Frogs live in wet areas. This can harm your camera. Here’s how to protect it:
- Use a waterproof camera cover. It keeps your gear dry.
- Bring a microfiber cloth. Wipe off any water drops on your lens.
- Put silica gel packets in your camera bag. They soak up extra moisture.
- Avoid changing lenses in damp areas. Moisture can get inside your camera.
- Let your gear warm up slowly after cold shoots. This stops condensation from forming.
Overcoming Low Light Conditions
Frogs often hide in dark places. This makes it hard to get enough light. Try these tips:
- Use a macro or ring flash. It lights up small areas well.
- Raise your ISO. This makes your camera more sensitive to light.
- Use a tripod. It lets you use slower shutter speeds without blur.
- Try off-camera lighting. It helps create interesting shadows.
- Look for frogs near the edge of dark areas. There’s often more light there.
Frequently Asked Questions
Capturing stunning macro shots of frogs requires specific techniques and equipment. These questions address key aspects of camera settings, lighting, lenses, focus, composition, and depth of field for amphibian photography.
What are the optimal camera settings for macro photography of amphibians?
For frog macro photos, use a small aperture like f/11 to f/16 for good depth of field. Set ISO to 100-400 to minimize noise. Shutter speed should be 1/60th or faster to freeze motion.
Fast shutter speeds help capture quick frog movements. Manual focus often works best for precise control.
What lighting techniques should be used to capture detailed macro photographs of frogs?
Macro or ring flashes work well for frog macro shots. They provide even lighting and reduce harsh shadows.
Diffused natural light can also produce great results. Reflectors help fill in shadows. Avoid direct on-camera flash, as it can create unflattering glare.
What lens types are recommended for macro frog photography?
A dedicated macro lens with 1:1 magnification is ideal for frog photography. Lenses in the 90-105mm range offer good working distance.
Extension tubes can increase magnification with standard lenses. Close-up filters are another budget-friendly option for macro effects.
How can one achieve sharp focus on small subjects like frogs in macro photography?
Use single-point autofocus and aim for the frog’s eye. Manual focus with live view magnification allows precise adjustments.
Focus stacking combines multiple shots at different focus points. This technique creates images with greater depth of field.
What are the best practices for composing a frog photograph using macro techniques?
Place the frog’s eye at an intersection point using the rule of thirds. Include some of the frog’s environment for context.
Shoot at eye level with the frog for an intimate perspective. Experiment with different angles to highlight unique features.
How to manage depth of field effectively in macro photography targeting amphibian details?
Use focus stacking to increase depth of field. Maintain a wide aperture while doing this. This preserves background blur.
Align the camera sensor parallel to the frog’s face. This maximizes the area in focus. Consider using tilt-shift lenses for precise control.